
TABLE OF CONTENTS
This article explains all the actions available on the Ticket Details page, including when and how to use them.
The action bar is a compact toolbar that appears at the top and bottom of the ticket conversation pane. From here, you can reply to customers, add private notes, forward messages, watch a ticket, or perform more actions, like merge, run scenarios, log time, edit details, and more.
Note: Some features described here (for example, Web Chat, Instagram, and certain Omni features) are available only to Freshdesk Omni customers. If you are on Freshdesk Standalone, you may not see those options.
For a complete overview of Ticket Details, see Understanding Ticket Details.
The list of available actions is:
- Watch icon: Receive email notifications when a ticket is updated.
- Reply: Add a response to the ticket.
- Add note: Add a public or private note to the ticket.
- Forward: Send the ticket to a third party.
- Close: Change the ticket status to Closed.
- More actions (three dots): Use this option to perform more actions like merging tickets, adding scenarios, etc.
Tip: See the list of keyboard shortcuts available for each action.
Watch a ticket
Keyboard shortcut (w)
The Watch ticket feature lets you receive constant updates on a ticket, even if it is not assigned to you. When you watch a ticket, you will receive email notifications every time it is updated. By default, you are automatically added as a watcher on tickets you create or edit.
How to watch a ticket?
- Click on the Watch button.
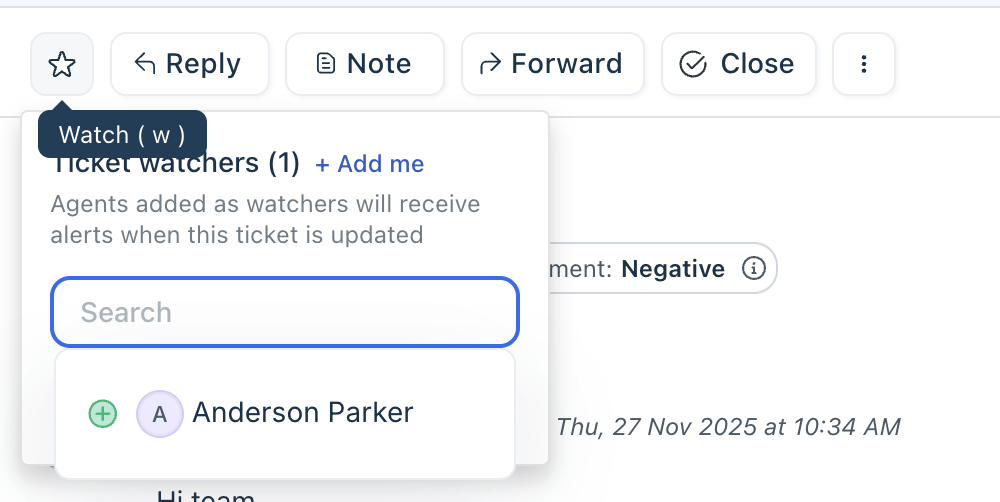
- To add yourself to the watchlist, click Add me.
- Use the search bar to add other agents to the watch list.
- To remove yourself from a watch list, click the Minus symbol next to your name in the list. You cannot remove other agents from the list.
Tip: The “Tickets I’m Watching” view on the Tickets tab shows you a list of all the tickets you’re watching.
Editor components
When you add a reply, note, or forward ticket, a rich text editor opens, with features to help you create well-crafted responses. 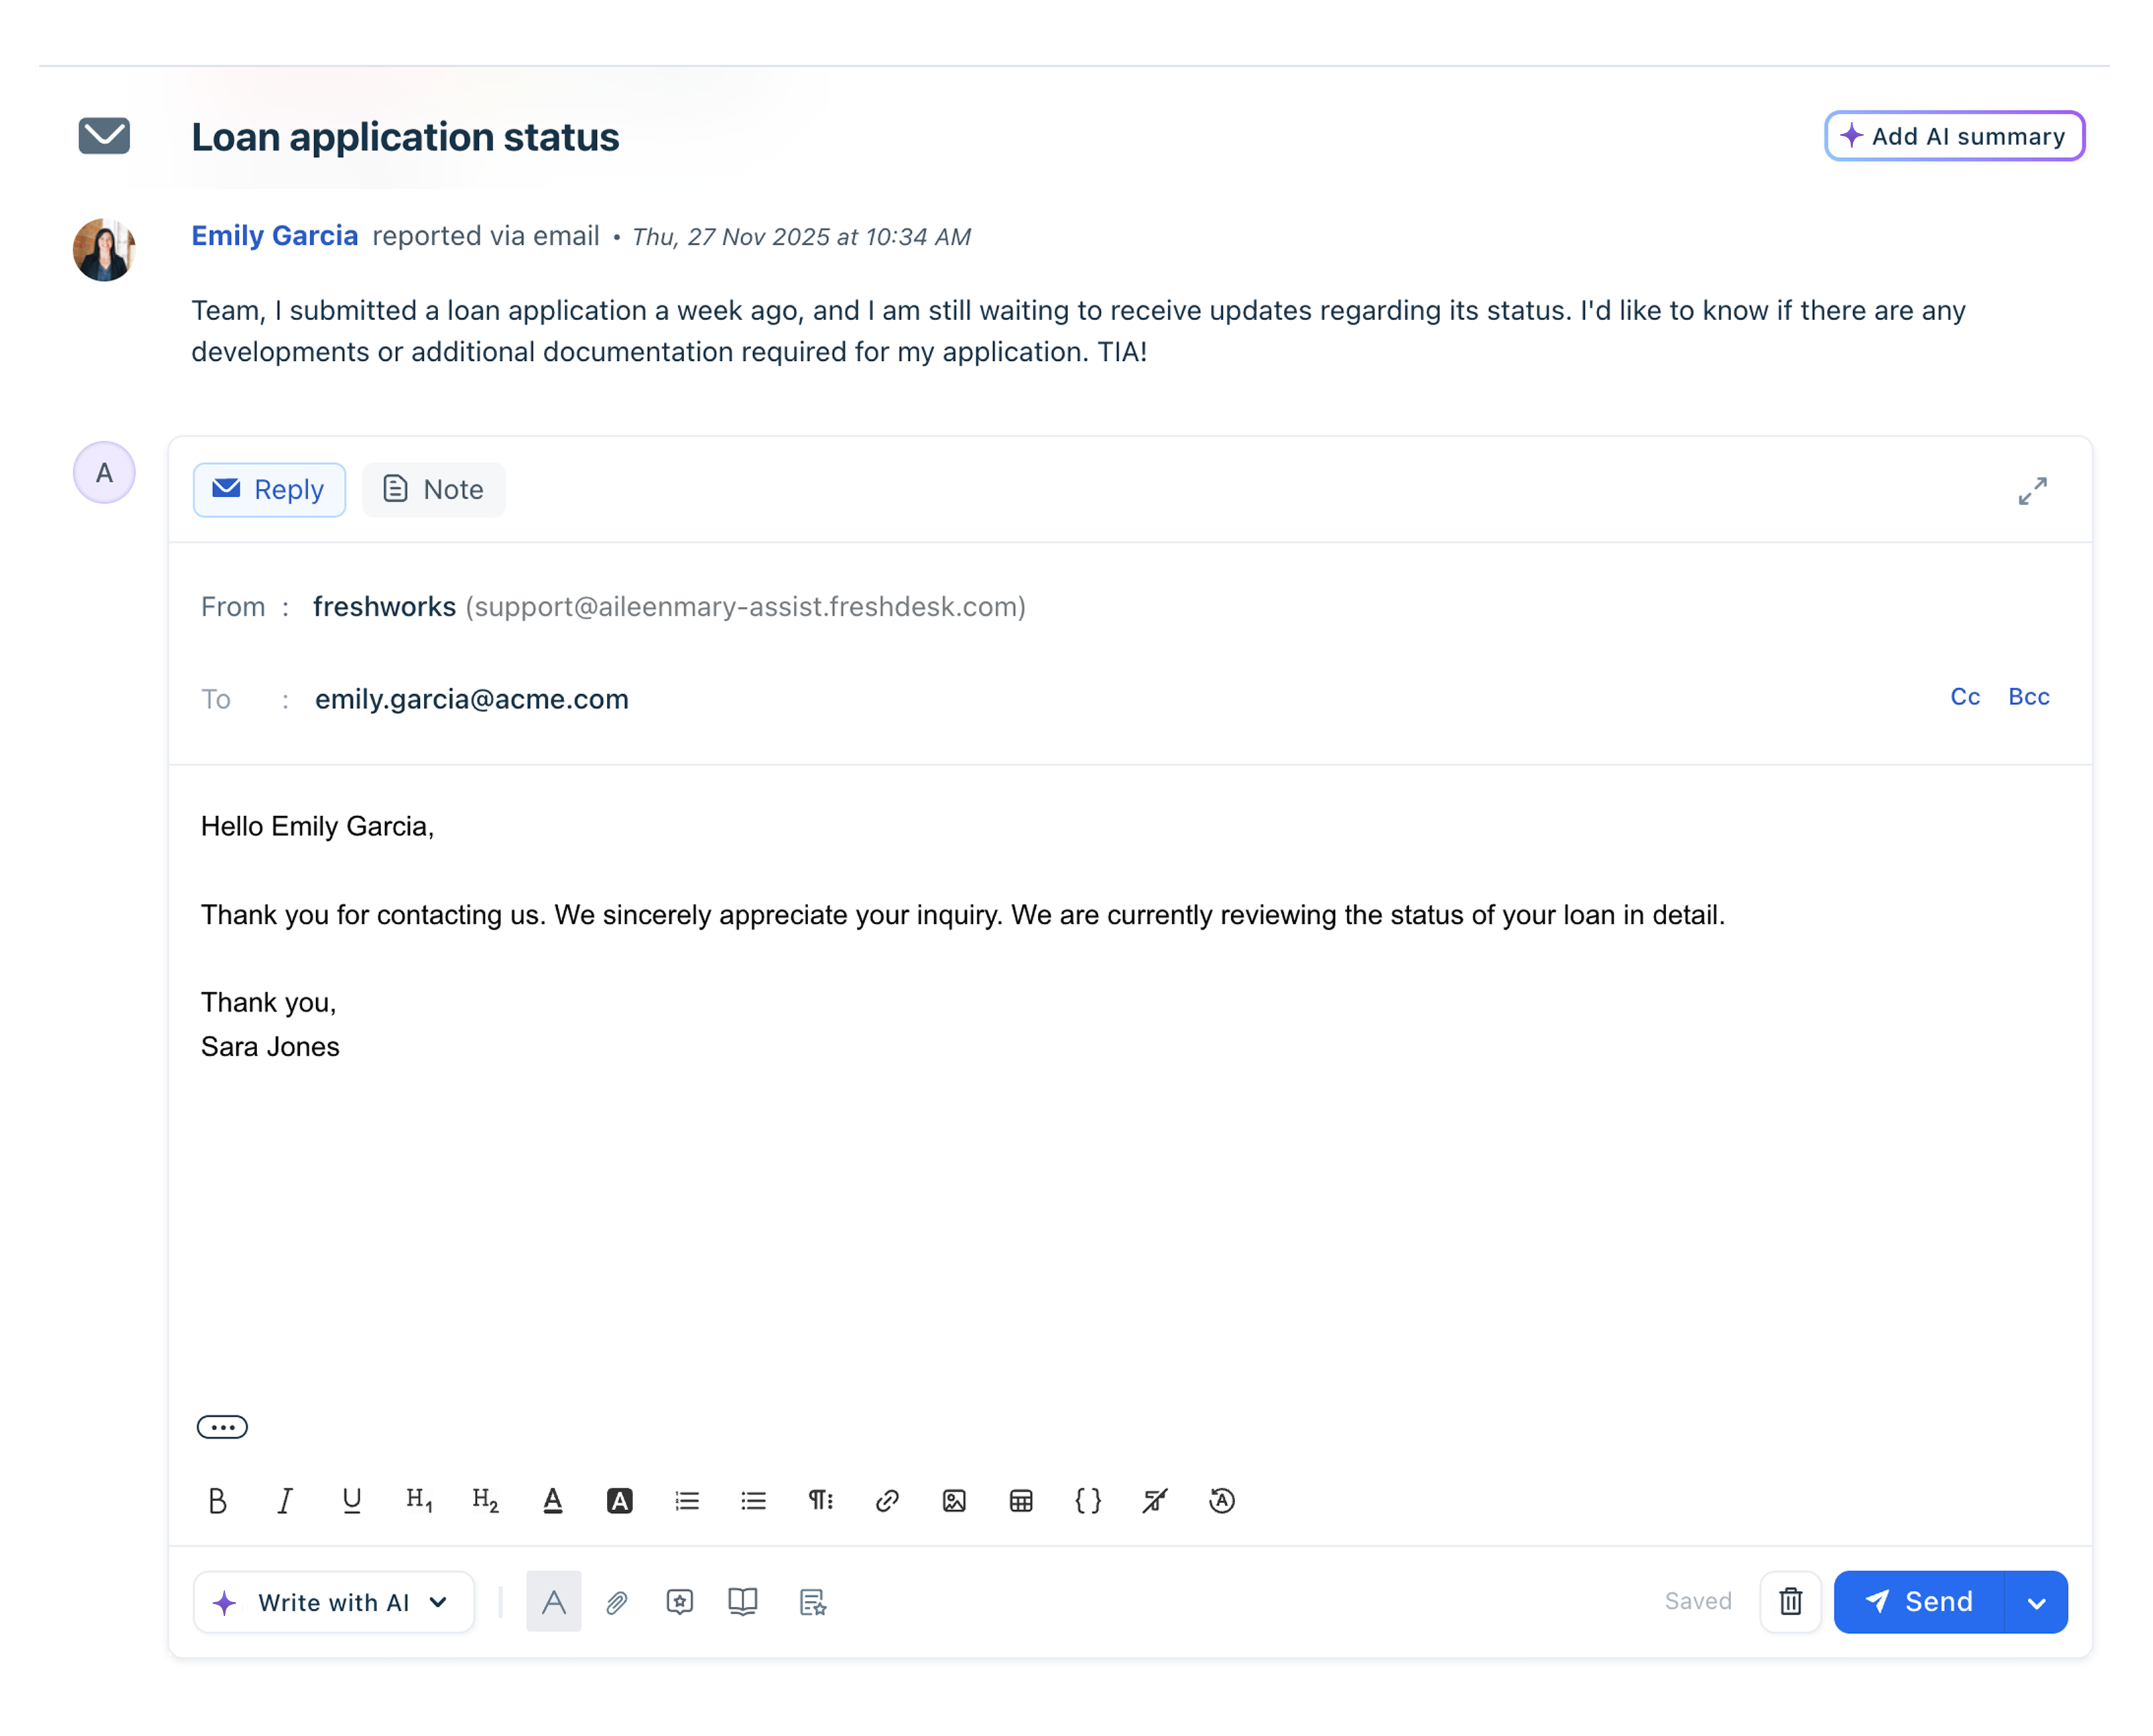
Editor features
The following features are available in the editor. You can hover over each icon to see the feature or option name.
| Feature | Description | Channels supported |
|---|---|---|
Formatting options | Use the formatting options:
You can also clear applied formats or reset to the default. | Email, portal, Web Chat Not supported for WhatsApp, Facebook Message, Facebook Comments, Instagram DM, and Instagram Comments |
File attachment | Add file attachments as extra information in your responses. You can upload files up to a maximum size of 25 MB. | All channels |
Canned responses | Use a predefined set of email templates to respond to common customer queries. You can use existing responses or create new templates. For more details, see using canned responses in a ticket. Note: Canned Responses is part of the Freddy AI Copilot Addon and is available only if purchased. | All channels |
Suggested solutions | Use solution articles to address customer tickets, providing valuable information for common issues. For more details, see About Solution Article Suggester. Note: Solution article suggester is part of the Freddy AI Copilot Addon and is available only if purchased. | All channels |
Canned forms | Use pre-filled forms to gather customer information. For details, see Using Canned Forms to increase agent productivity. | All channels |
Freddy AI features | If your account is enabled with the Freddy AI Copliot add-on, you will have additional AI features to improve your responses with Freddy AI. For more details, see Improve response with Freddy AI. | All channels |
Reply to ticket
Click Reply to open the editor. The reply options vary based on the ticket channel.
- Email, portal, or phone tickets: You can send responses via email and add recipients in the To, CC, and BCC fields.
- Replying to WhatsApp
The following options are available for replying to WhatsApp tickets:- WhatsApp direct message (default): Send a standard reply through your WhatsApp Business number.
- WhatsApp template messages: Reply to customers using a WhatsApp template.
Note: Replying via template message is available only from Growth plans. For more details, see WhatsApp Template Messages.
- Web Chat, Facebook, and Instagram Tickets: Use the default reply option to respond directly on the same channel.
Tip: Use Freddy AI Writing assistant to improve your responses. For details, see Improve response with Freddy AI.
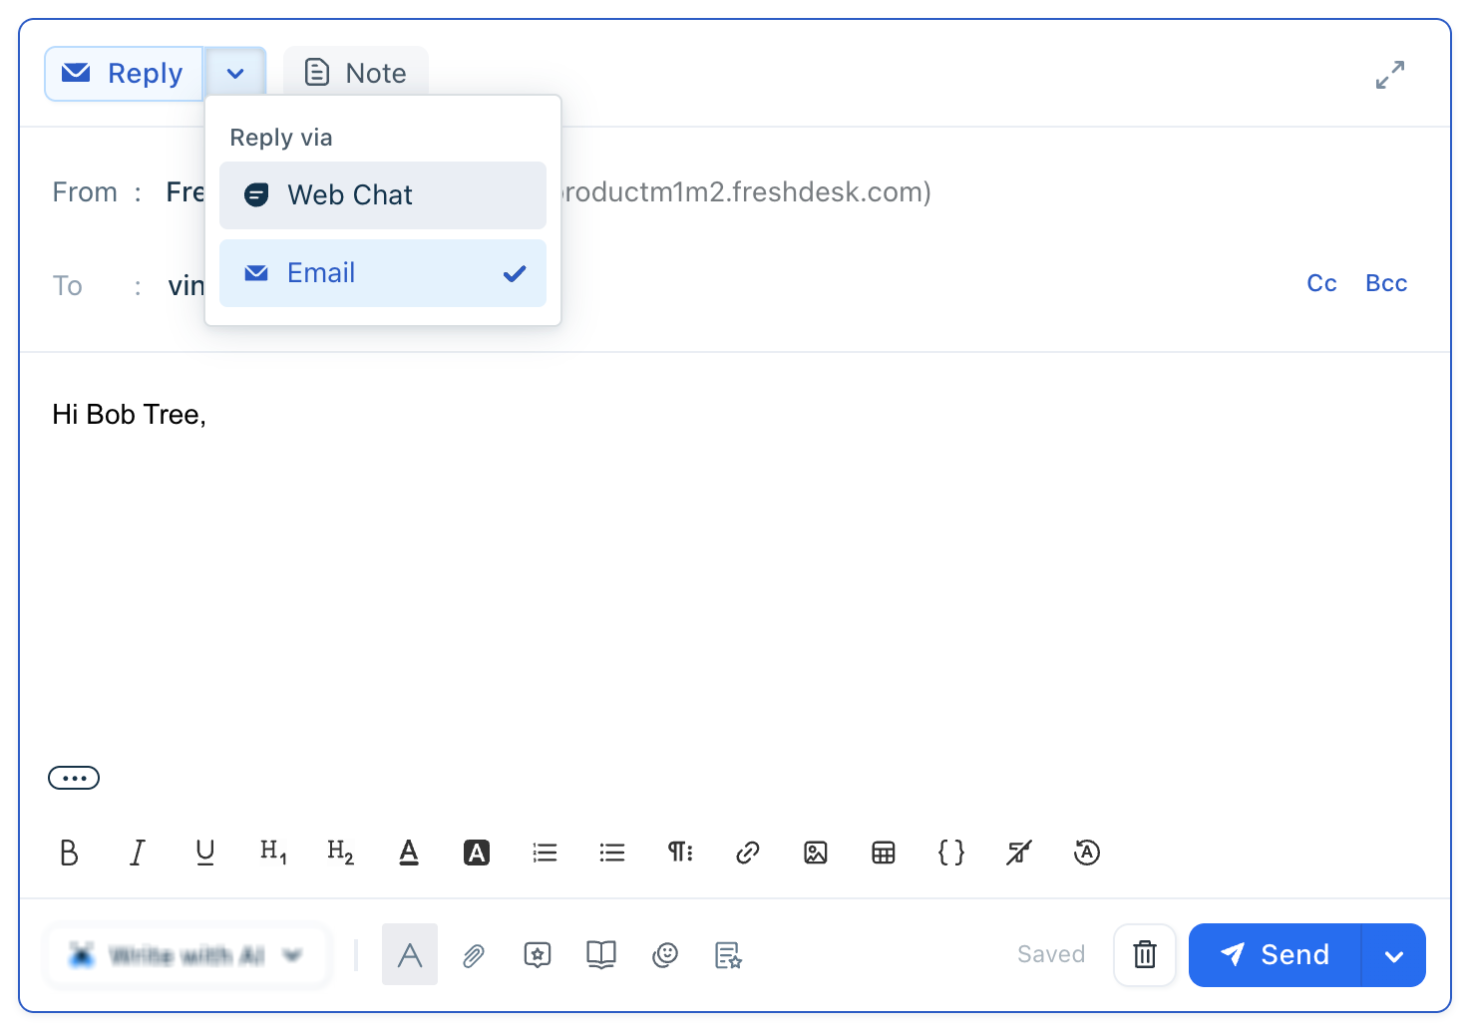
Use channel switcher
For Web Chat, WhatsApp, and other social channels, you can switch the reply channel to Email. If you use this option, the customer receives the response by email instead of the original channel.
Example: For a Web Chat ticket, replying via Email sends the response as an email rather than a Chat message on the widget.
To reply via Email for other channel tickets:
- The customer must have a valid email address.
- The Email channel must be configured in your account.
Reply to multiple recipients
By default, you can add only one recipient while responding to Email tickets. However, if your Admin enables the "Flexible Email Recipients" option in Email Advanced Settings, you can add multiple recipients in the "To" field.
This gives you the flexibility to move the requester to the CC or BCC field. You can add up to 50 recipients in each field: To, CC, and BCC.
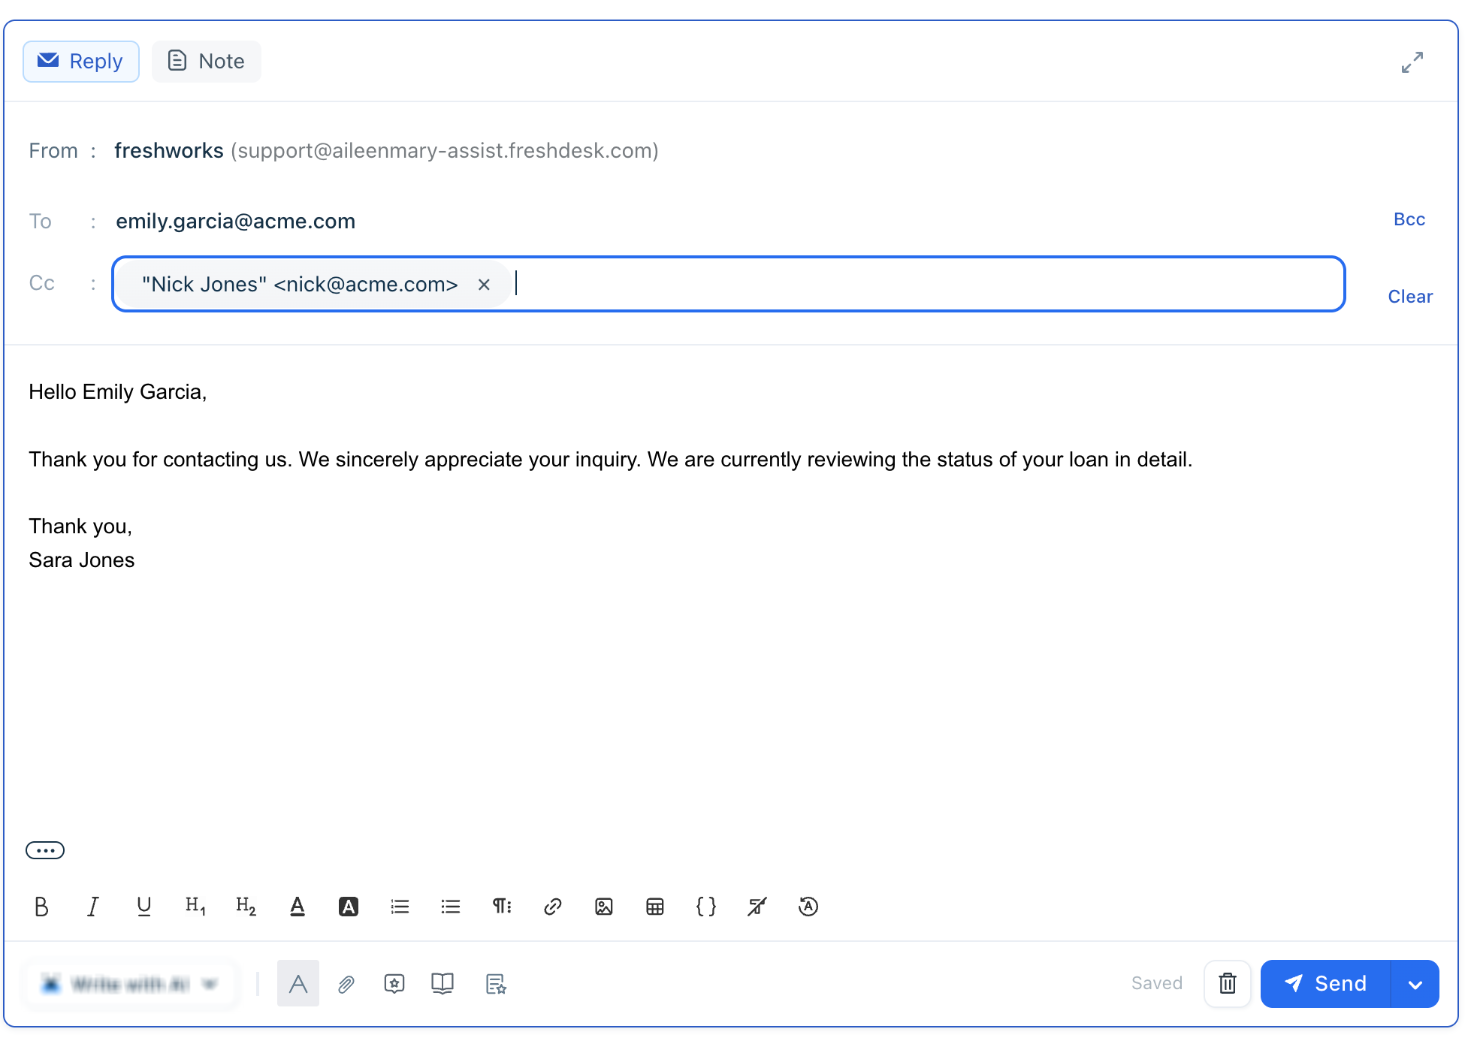
Note: The requester of the ticket will remain the same unless manually updated by the agent. However, if you remove the requester from all fields, the email reply will be threaded as a private note.
Quick actions in replies
- /c: Insert a canned response without replacement. Use the search pop-up to find the right canned response.
- /s: insert a solution article. Use the search pop-up to find the right article.
Undo send
After sending an email reply, you can cancel the action within 10 seconds. This feature is available from the Growth plan onwards and is only applicable to when the replying channel is Email tickets.
To enable this:
- Click your profile in the top right corner.
- Select Profile settings.
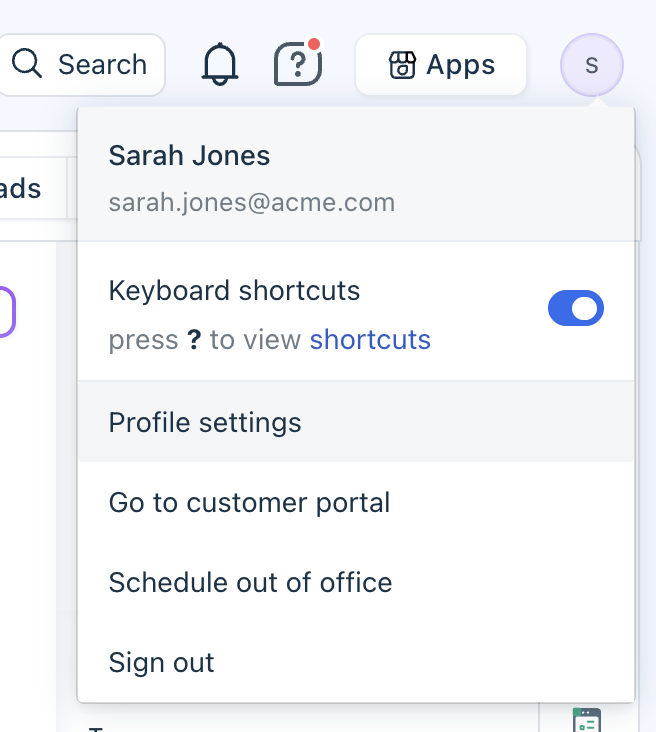
- Toggle the Undo send option and click Save.
You will start seeing the Undo option after you send a reply.
Add notes
Collaborate with other team members and share information or log updates for future reference. You can add:
- Public note: Visible to the contact within their support portal, but does not trigger an email notification.
- Private note: Visible only to agents within your organization, as long as they have access.
- In the reply editor, click Note.
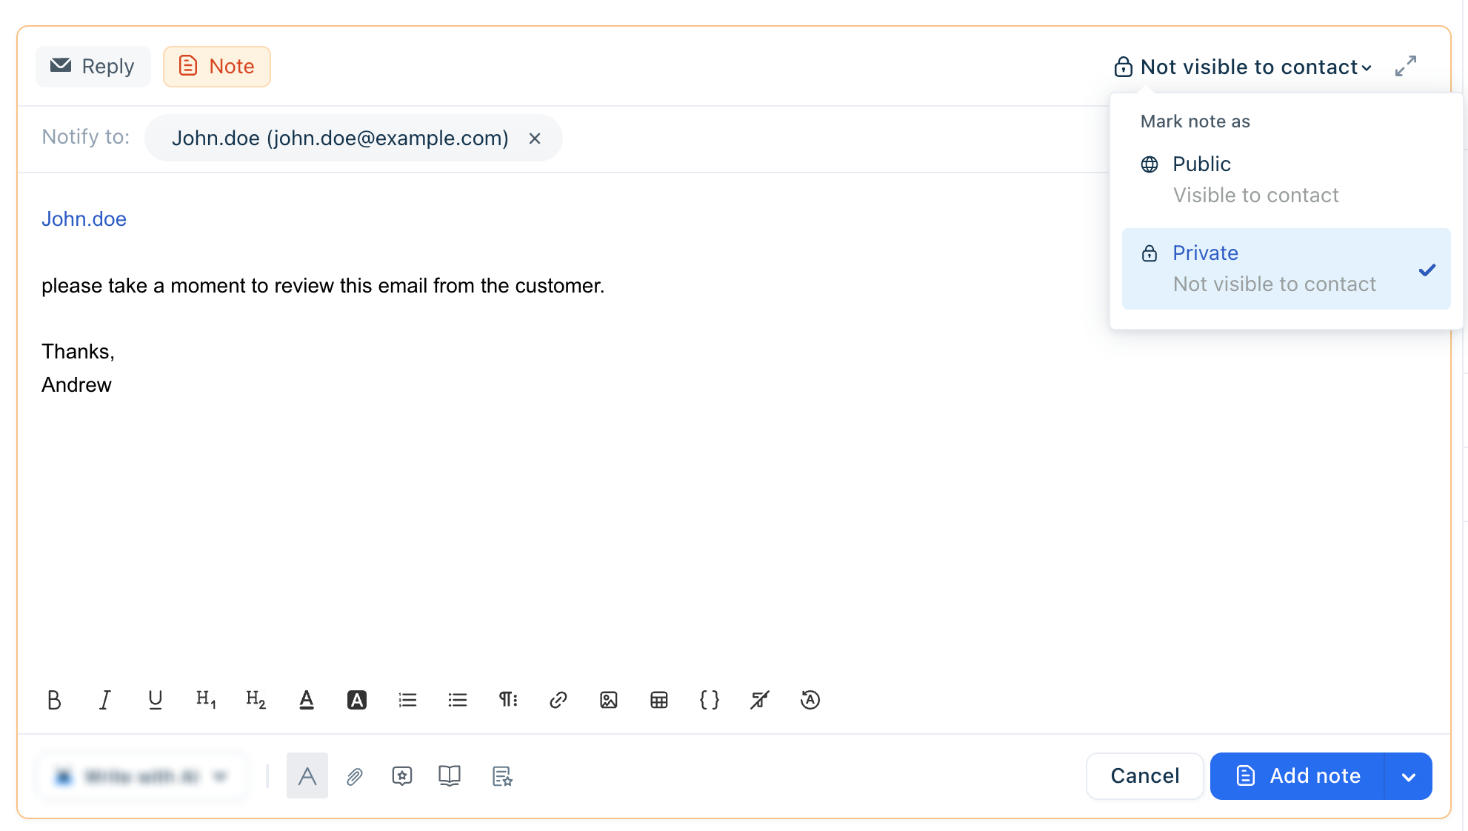
- Set the visibility of the note:
- Public: Add the text you want to add as a public note.
- Private: Use @ within the note to select an agent and add your note. Note that restricted agents, even if tagged, cannot view the ticket.
You can use all the editor features while adding notes.
- Click Add note.
Note: When replying to Web Chat tickets (default replying), you can only add private notes.
Forward tickets
Forward the ticket to third-party vendors or external users.
- Click Forward from the action bar.
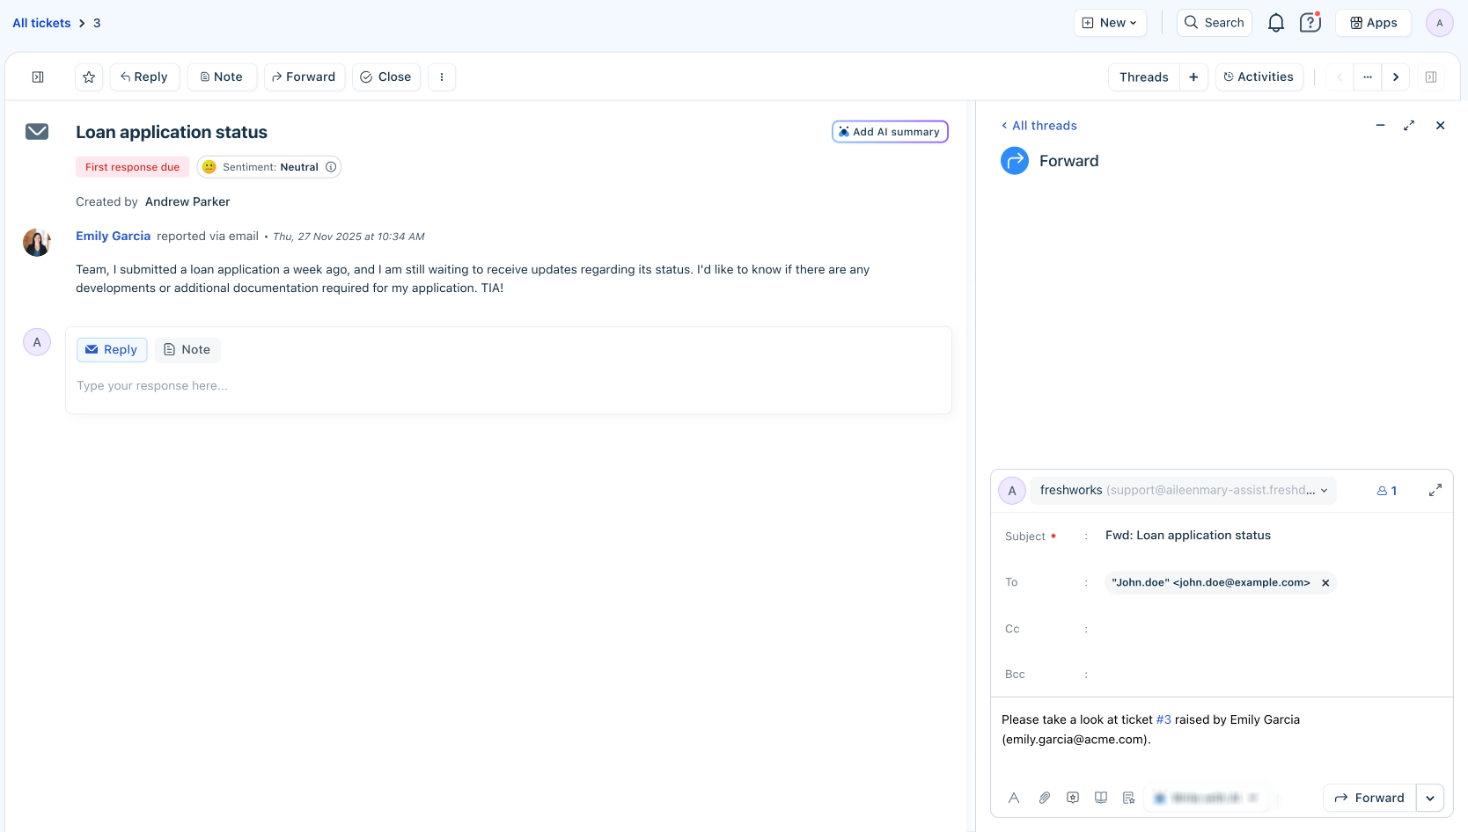
- Add the recipients in To, CC, and BCC fields.
Any subsequent replies from the recipient will be added as a private note in the ticket. You can further respond to these replies and continue the conversation in the ticket thread. Additionally, you can use all the Editor features to add any additional text. - Click Forward. While forwarding a ticket, you can also choose a ticket status. By default, the status is open.
Note: The Forward option will only forward the last 4 interactions in the ticket. You can also forward an individual reply from the ticket. However, you cannot forward private notes added to the ticket.
More Actions
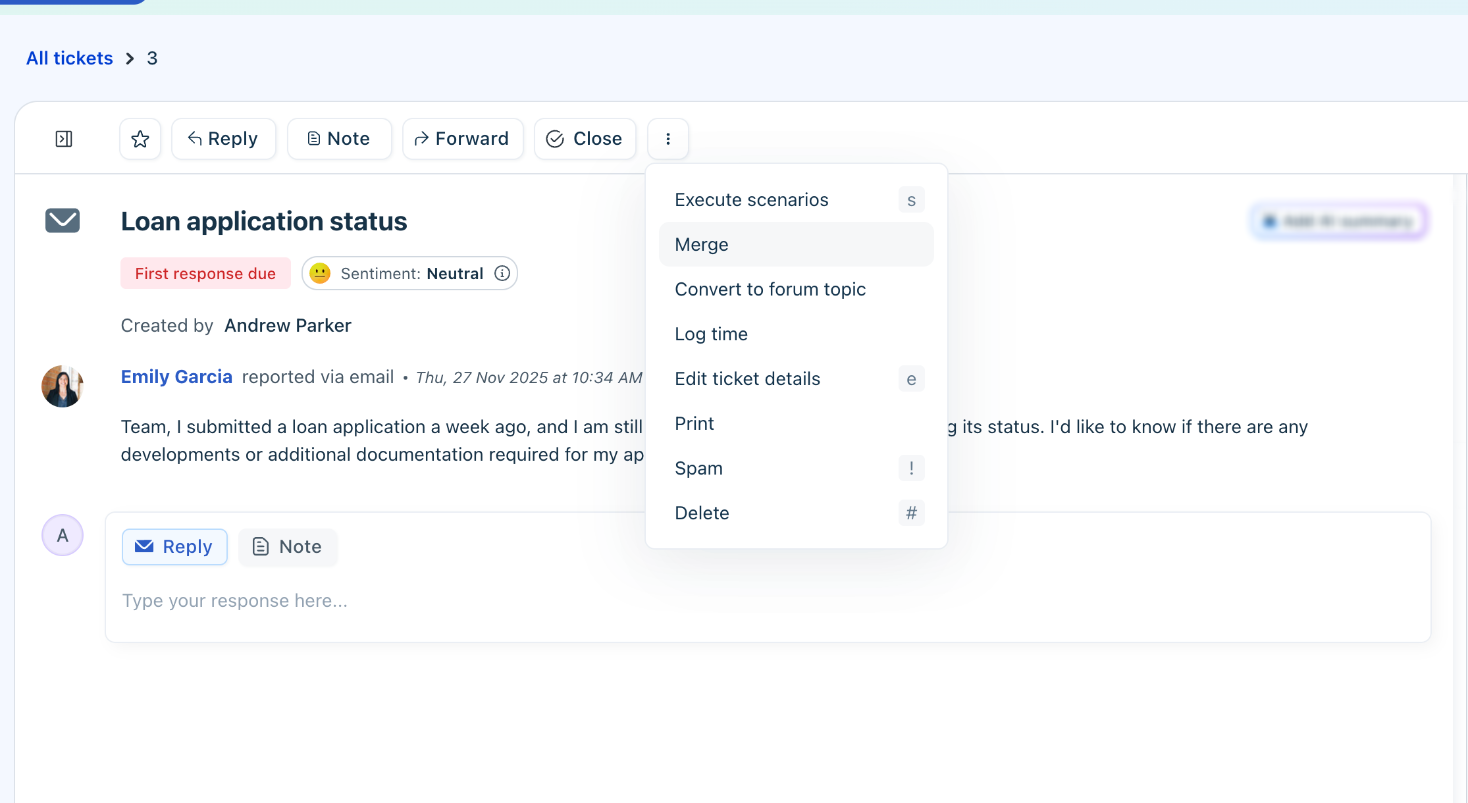
The action bar provides additional actions that you can perform on a ticket. Click on the three dots in the action bar:
- Merge
- Execute scenarios
- Log time
- Edit ticket details
- Delete
- Spam
Merge tickets
Customers may create multiple tickets for the same issue through different channels or by contacting different agents. To avoid duplicate work and keep all related conversations in one place, you can merge these tickets into a single ticket.
Note: You cannot merge tickets from Web chat, WhatsApp, Facebook, or Instagram.
When you merge tickets, you select one ticket as the primary ticket, and the remaining tickets become secondary tickets. The following changes occur after the merge:
- Conversations from the secondary tickets are moved to the primary ticket and displayed in chronological order.
- You can choose to add the requesters and CC recipients from the secondary tickets to the primary ticket.
- A private note is added to each secondary ticket with a link to the primary ticket. The primary ticket also includes a private note with the merge details and conversations from the secondary tickets.
- All secondary tickets are automatically closed and removed from the ticket list view.
- You can merge tickets with parent, child, or related associations.
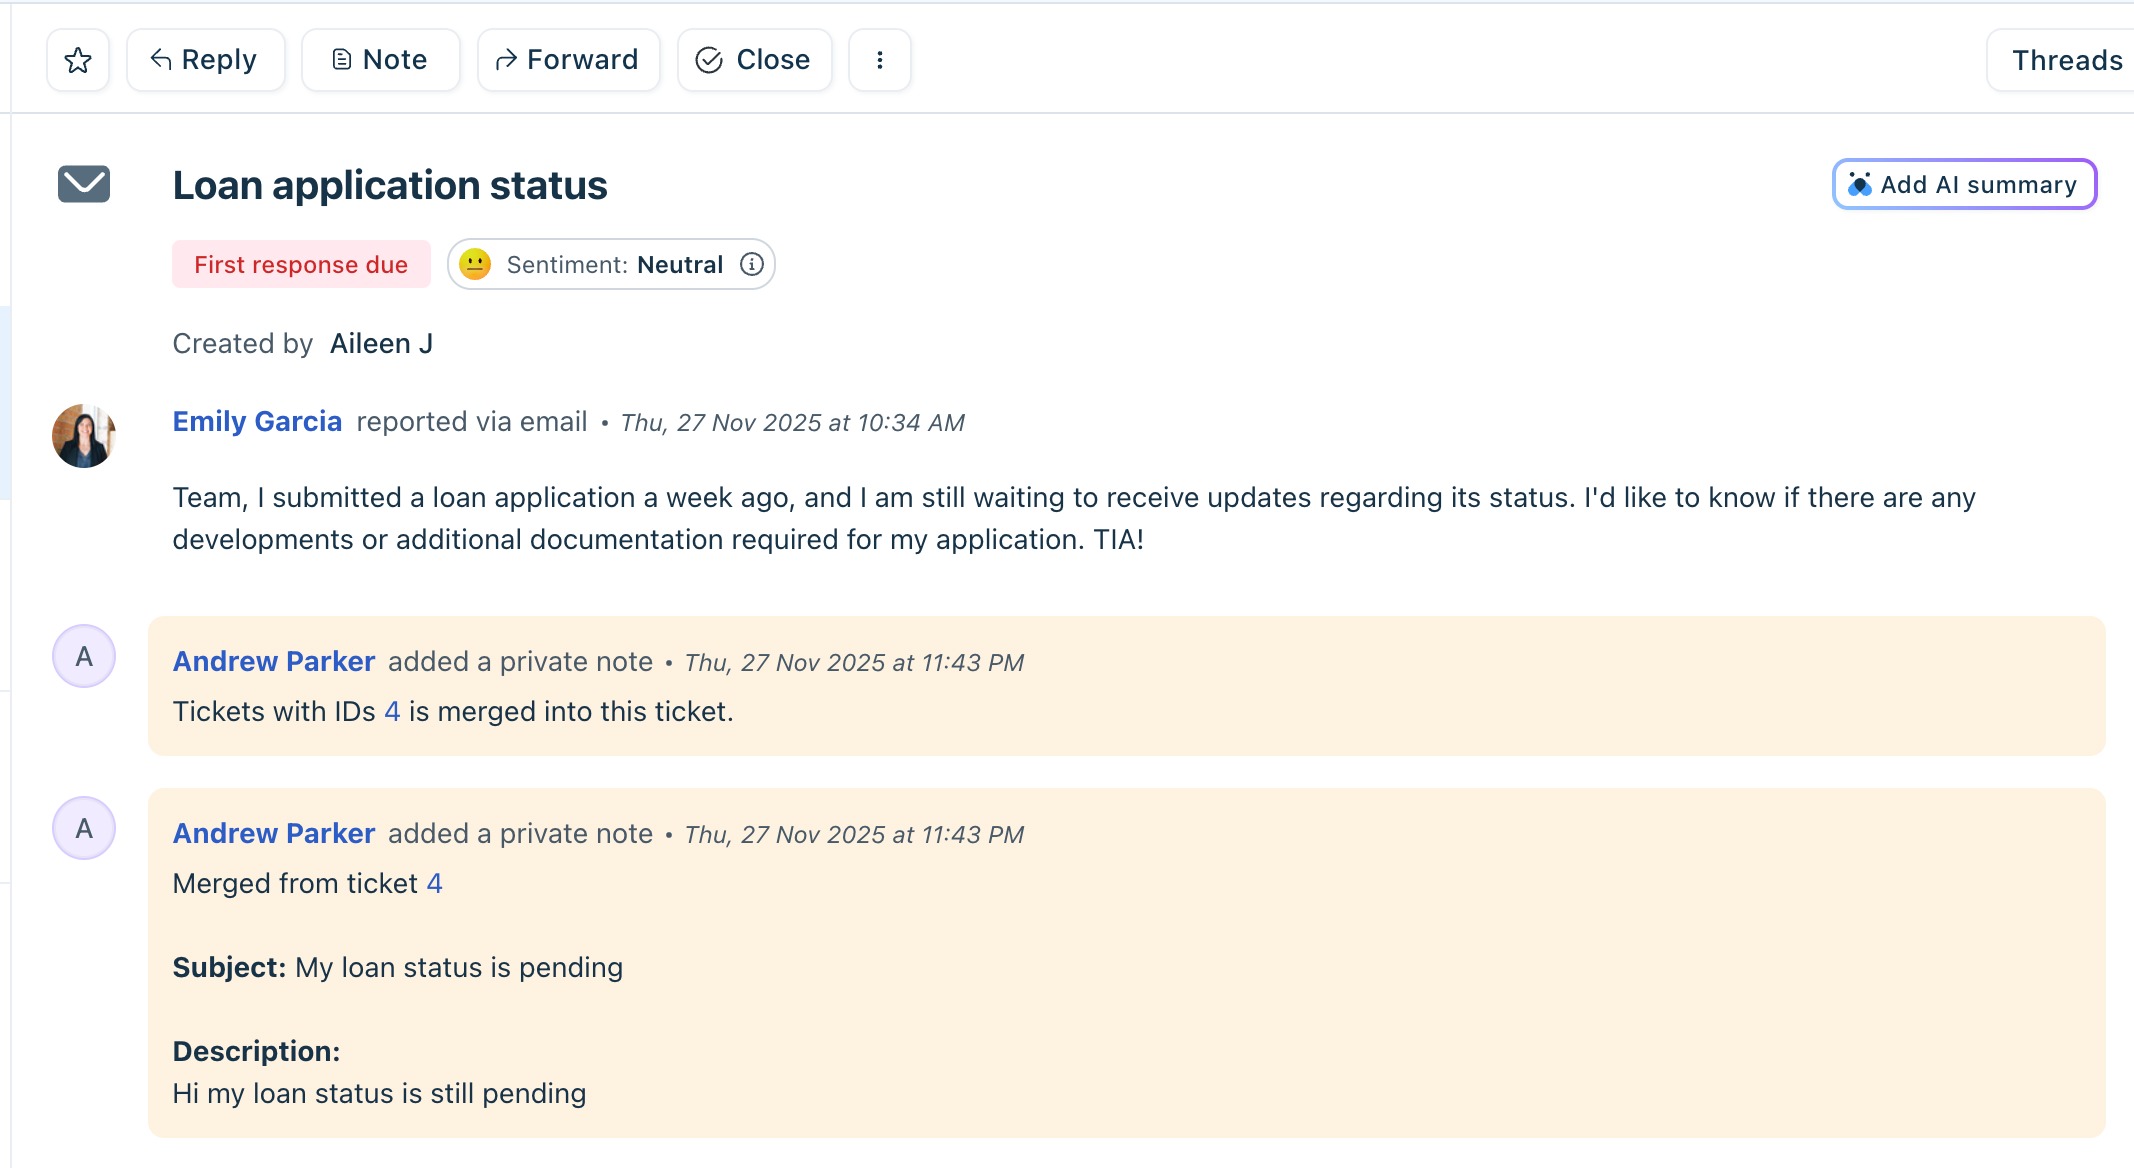
Tip: By default, the note added to the secondary tickets is private. Keeping the note private prevents email notifications from being sent to requesters. If you make the note public, requesters may receive an email notification.
To merge tickets:
- From the action bar, click on the three dots and select Merge.
- In the Merge ticket pane, search for the tickets by Contact, Ticket ID, or Subject.
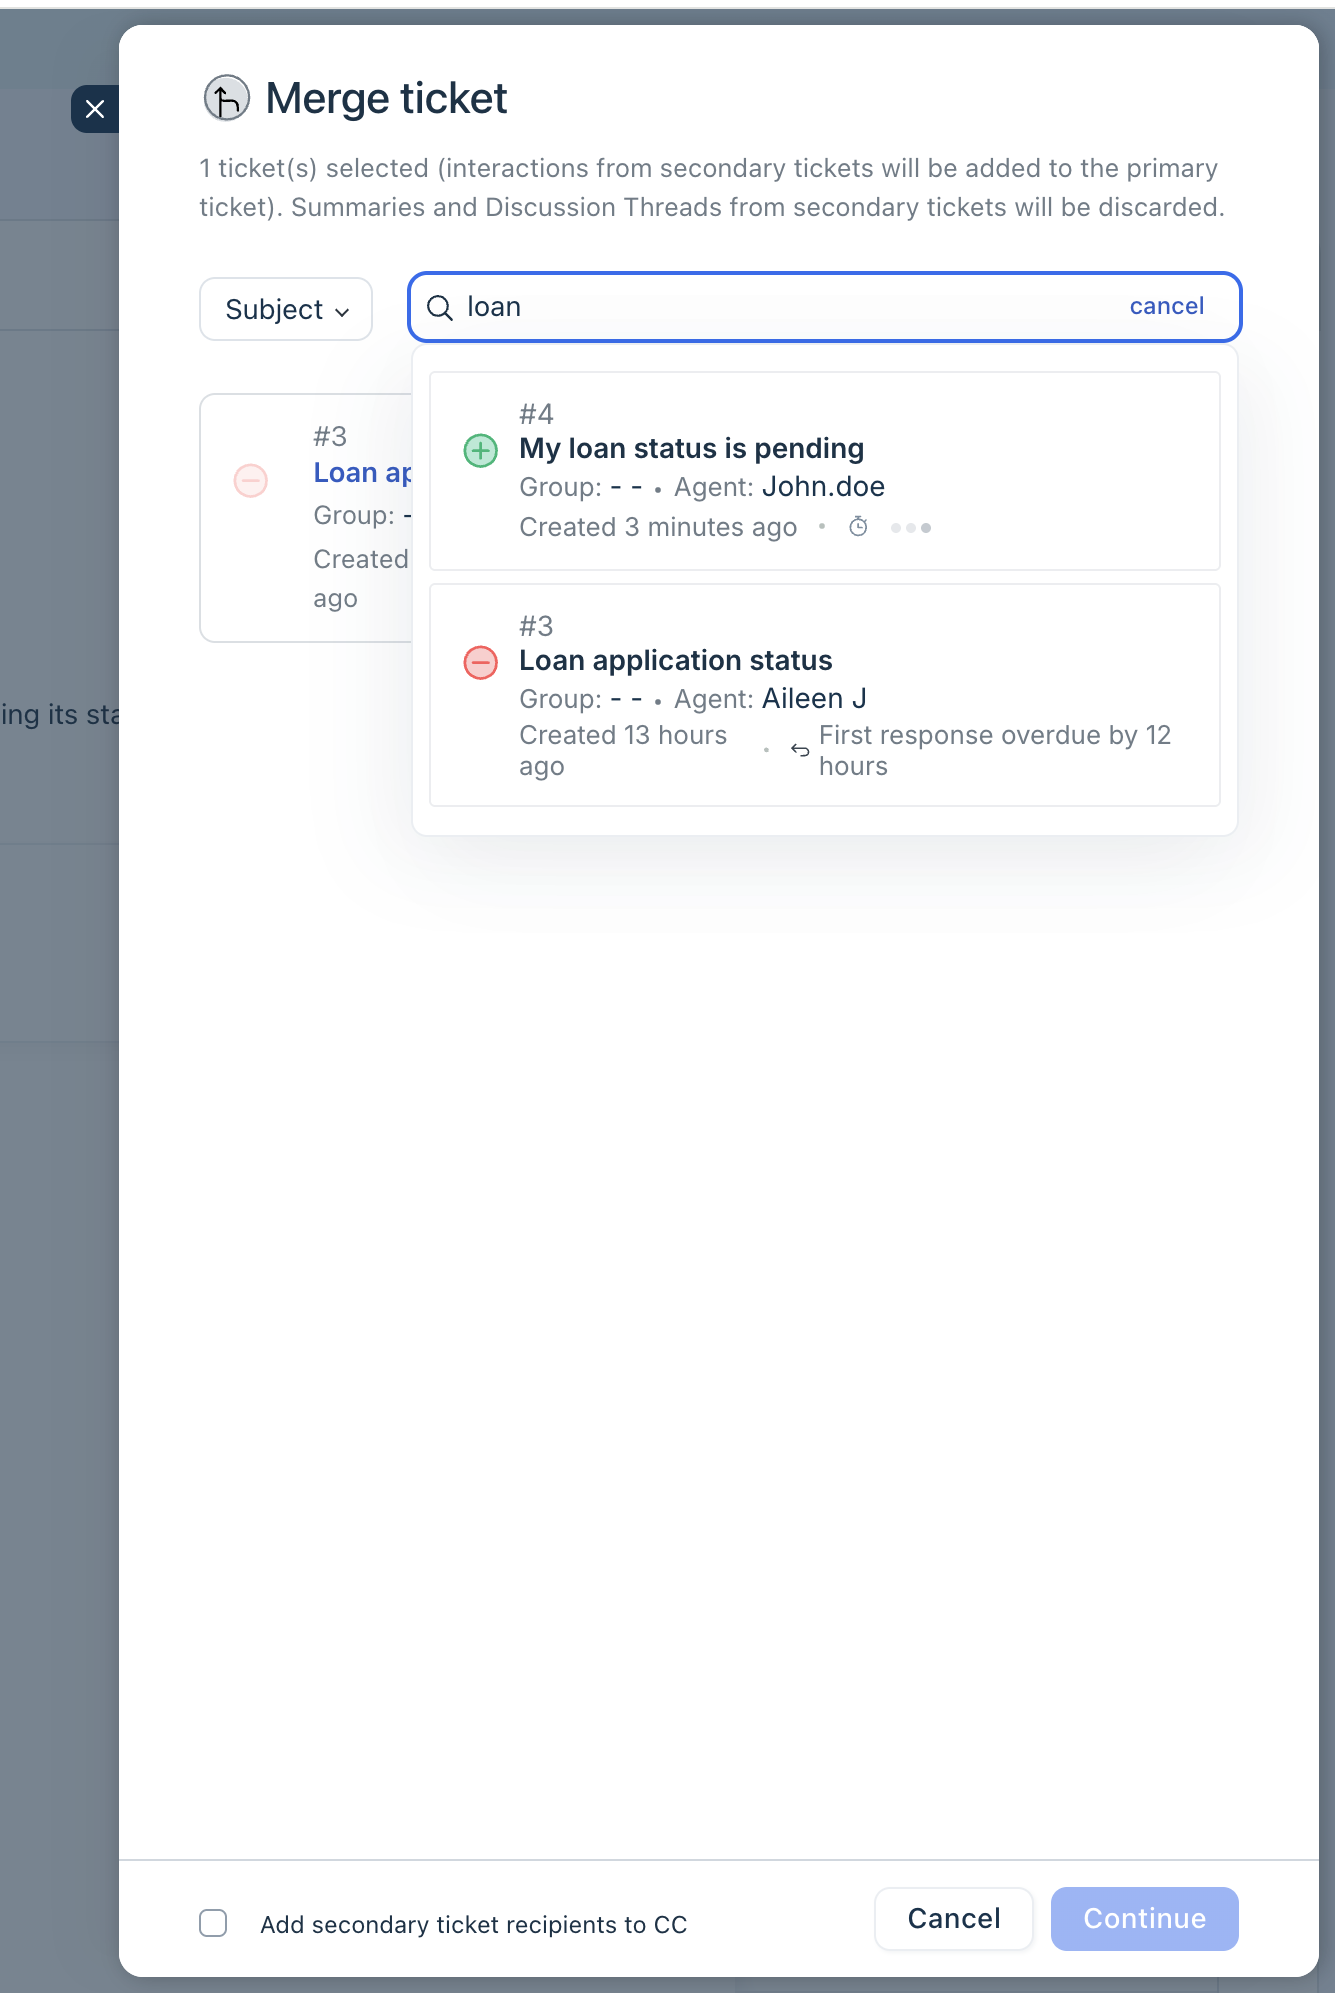
- Click the + icon next to each ticket that you want to merge.
- As an optional step, select Add secondary ticket recipients to CC.
- Click Continue.
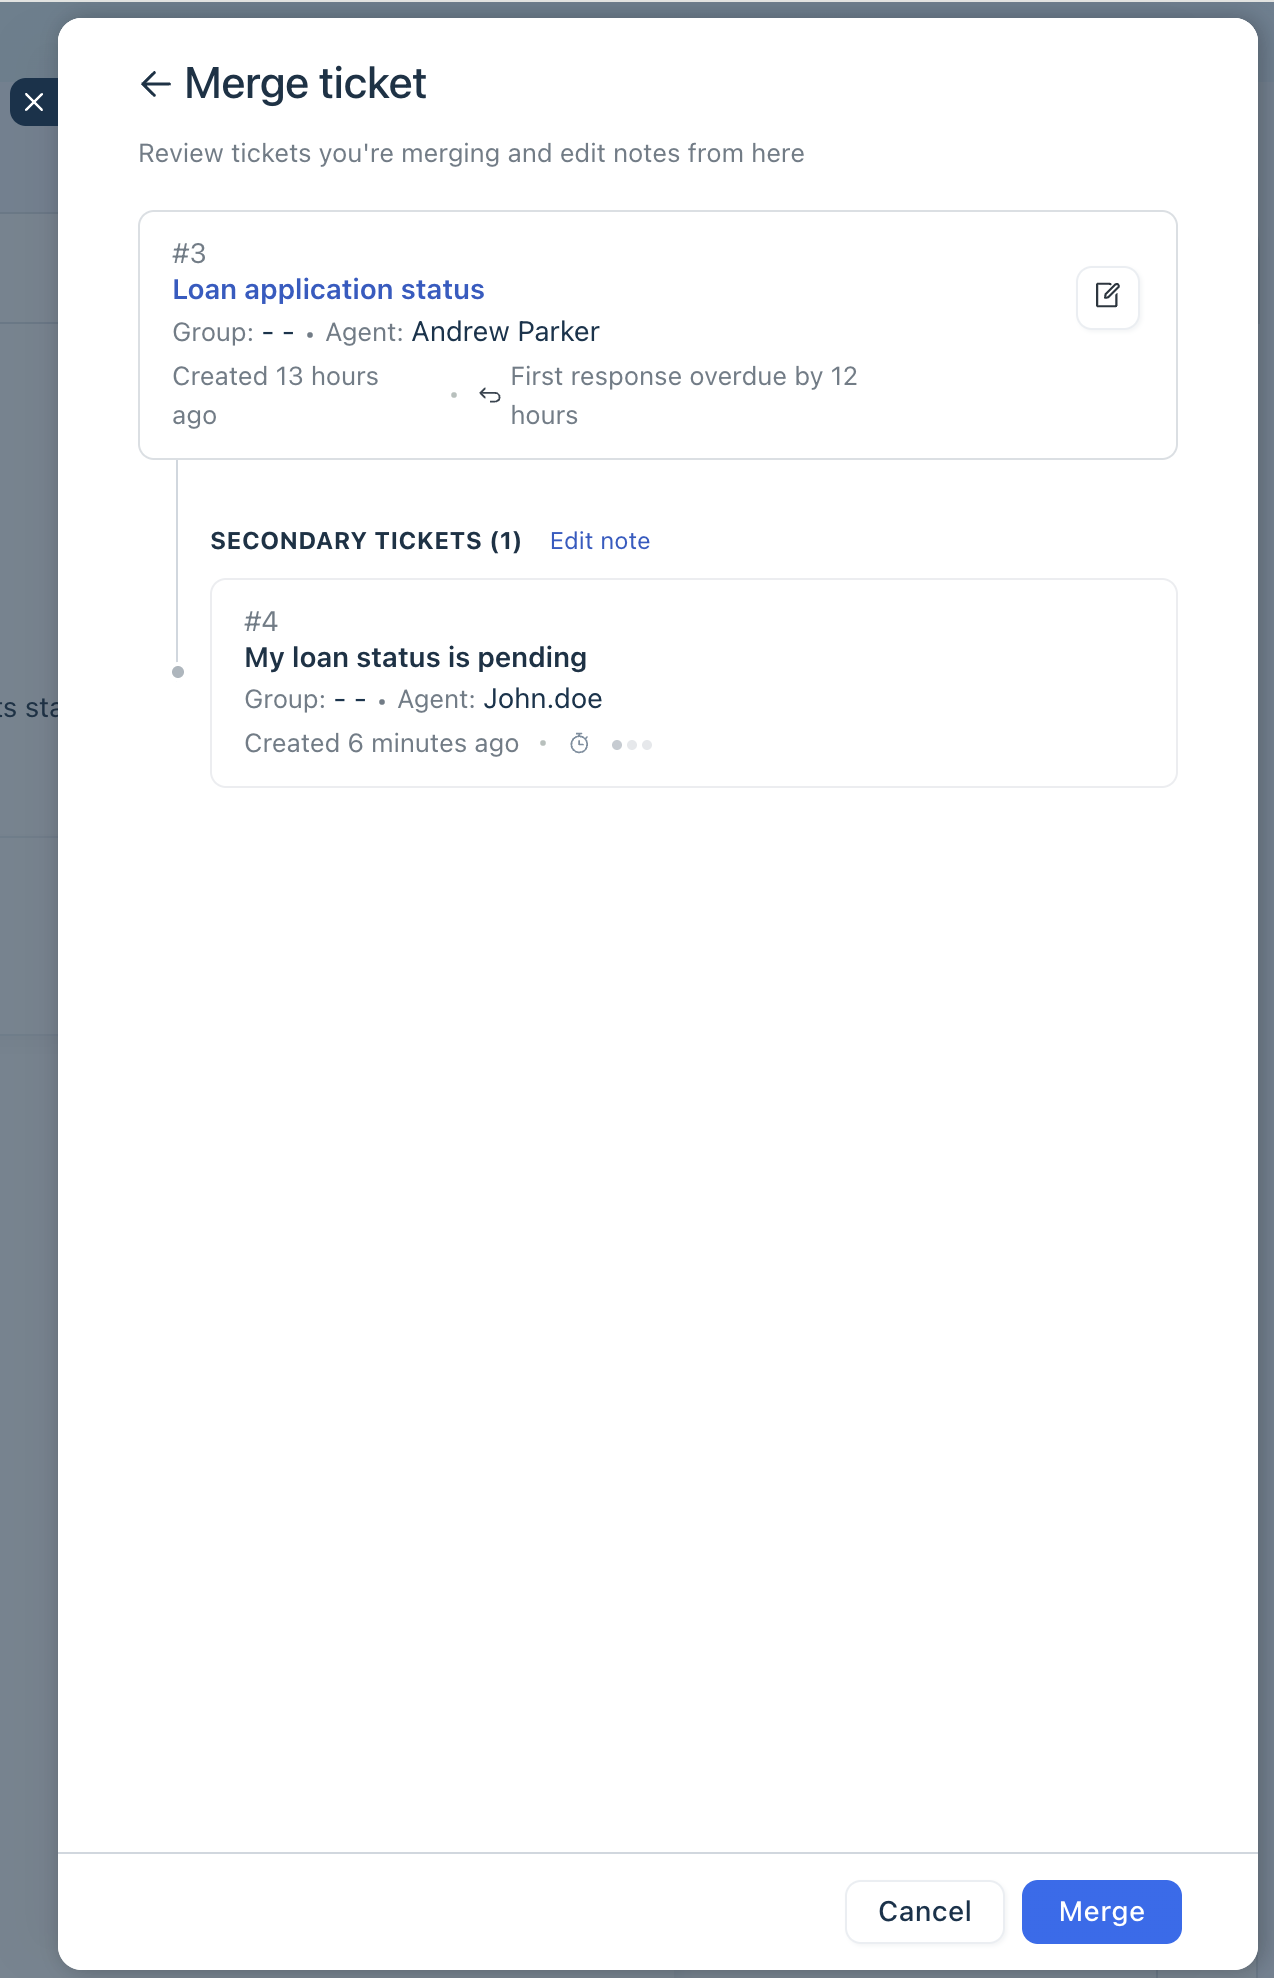
- On the next screen, do the following:
- Review the ticket hierarchy.
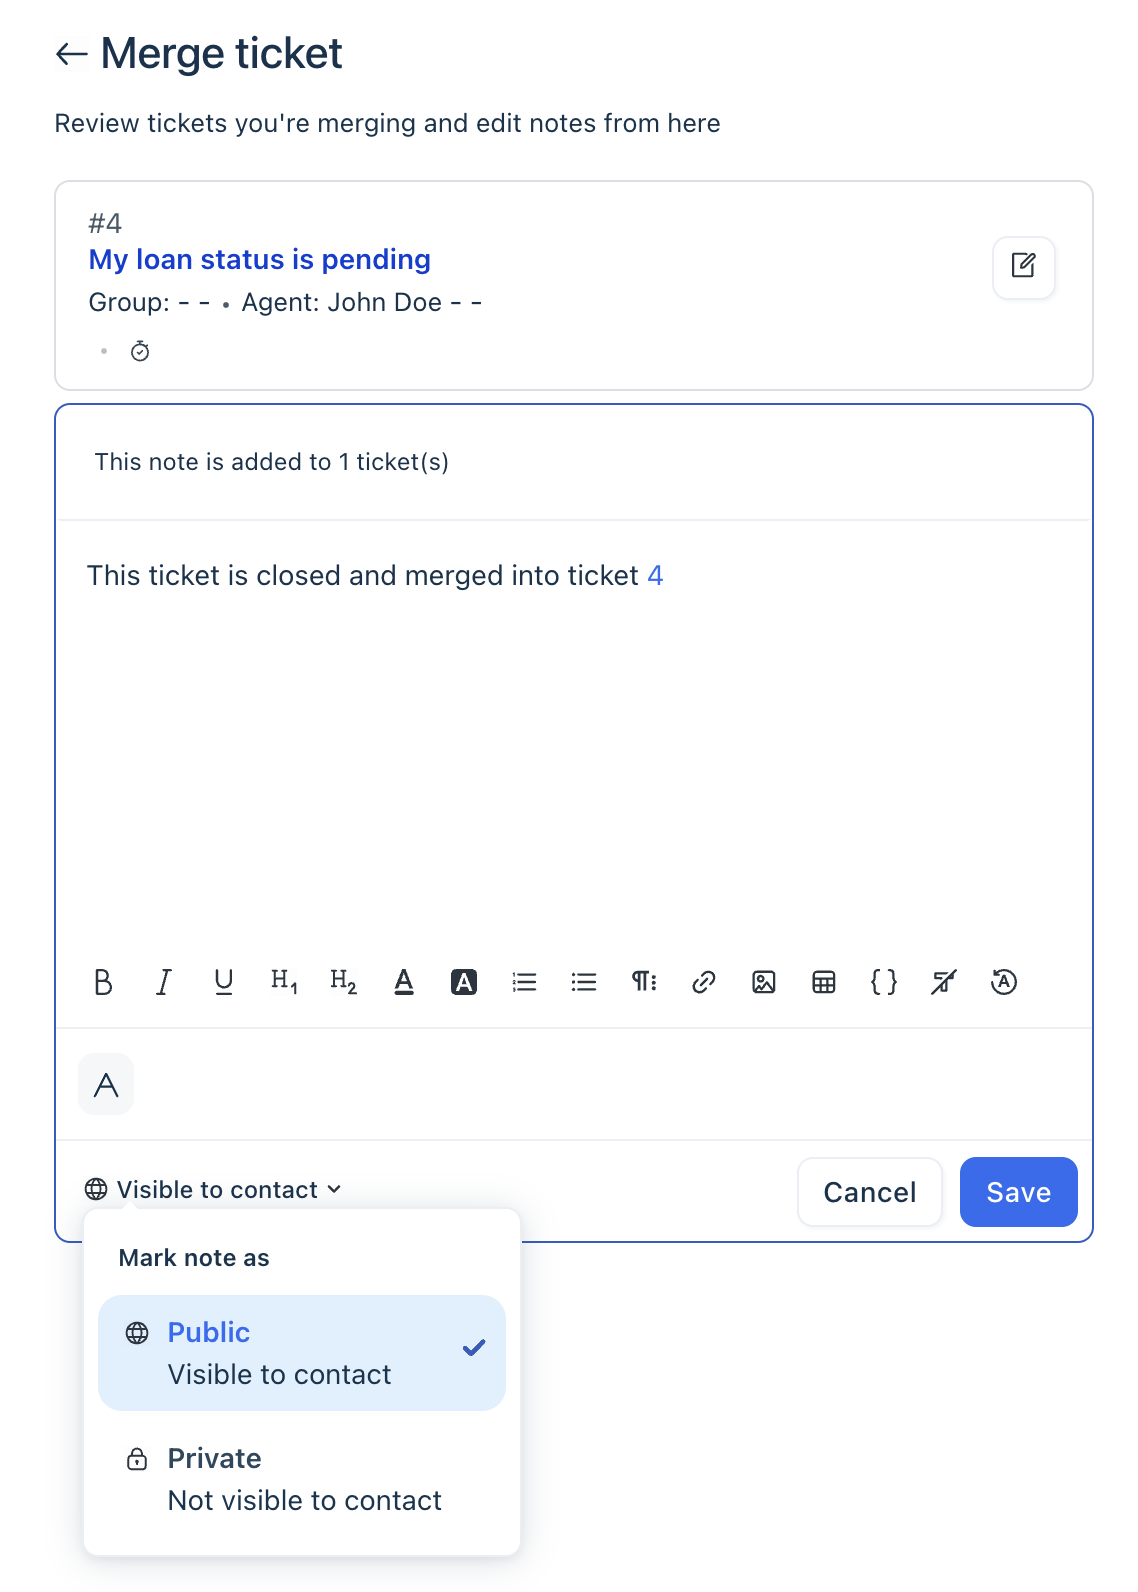
- Click Edit note to modify the default note.
- Choose the visibility. By default, the note is private. If required, change the visibility to public,
- Click Save.
- Review the ticket hierarchy.
- Click Merge.
Execute scenarios
Keyboard shortcut (s)
Execute scenarios on tickets to automate repeated tasks. For example, for a ticket related to refunds, you may:
- Tag the ticket as Refund
- Assign the ticket to the Refunds group, and
- Set the status of the ticket to Processing Refund.
Instead of doing these repeatedly, you can create a scenario automation and execute them in a single action.
Note: Agents can execute scenarios on tickets only if admins have created the required scenarios. For instructions, see Execute Scenario Actions on Tickets.
To execute scenarios on tickets:
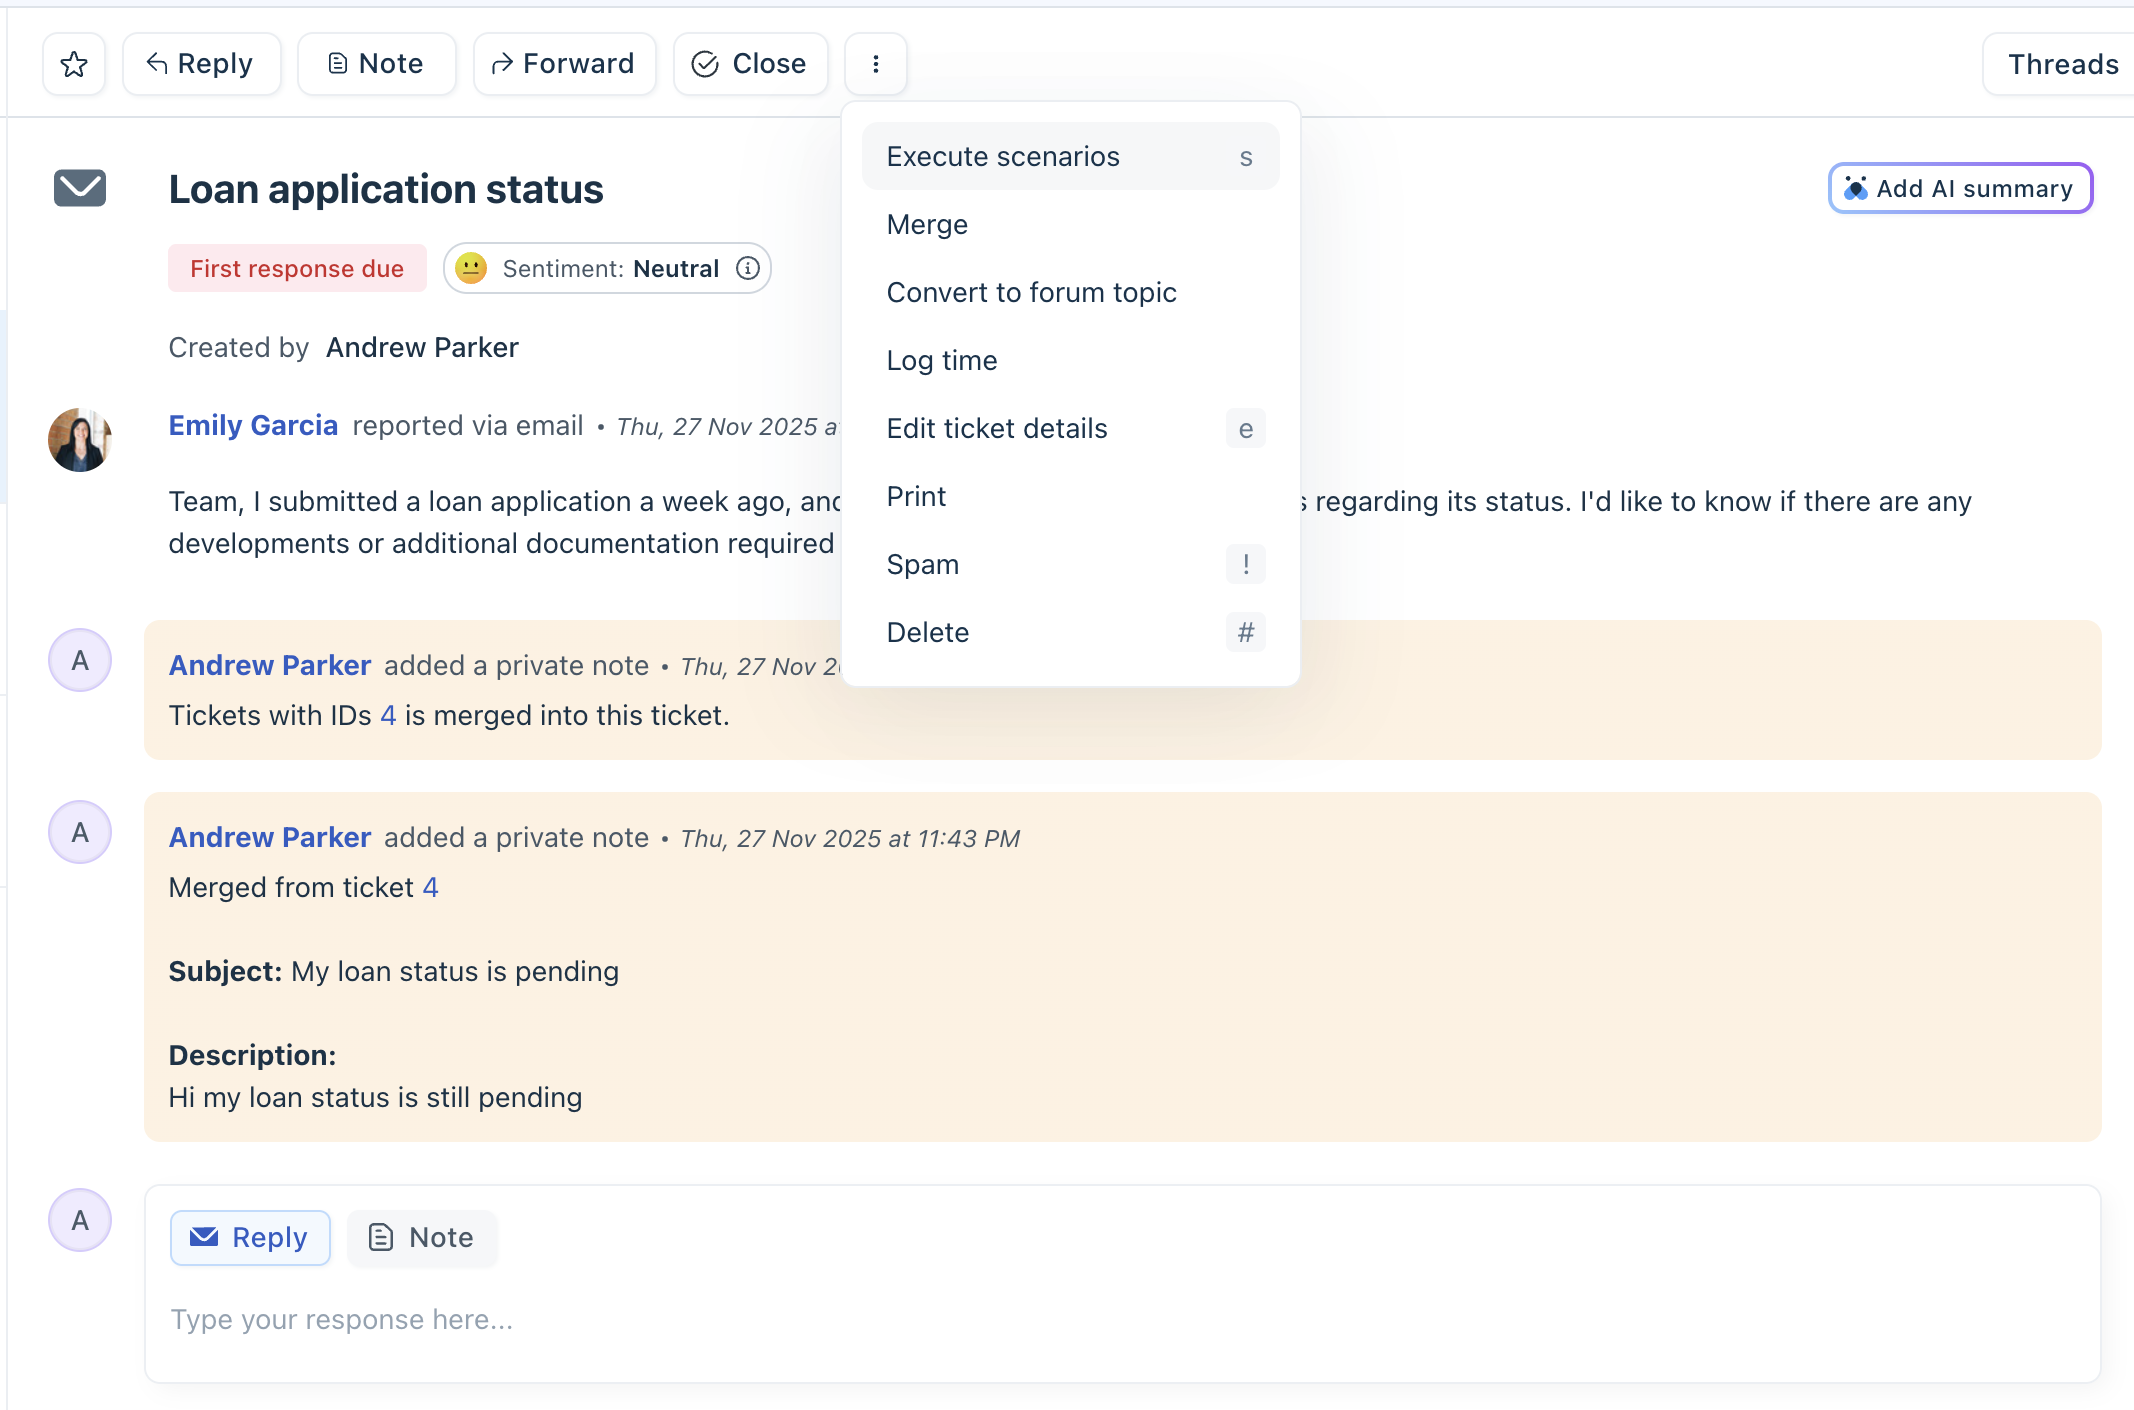
- On the Action bar, click on the three dots and select Execute Scenarios.
- Choose the scenario and click Execute.
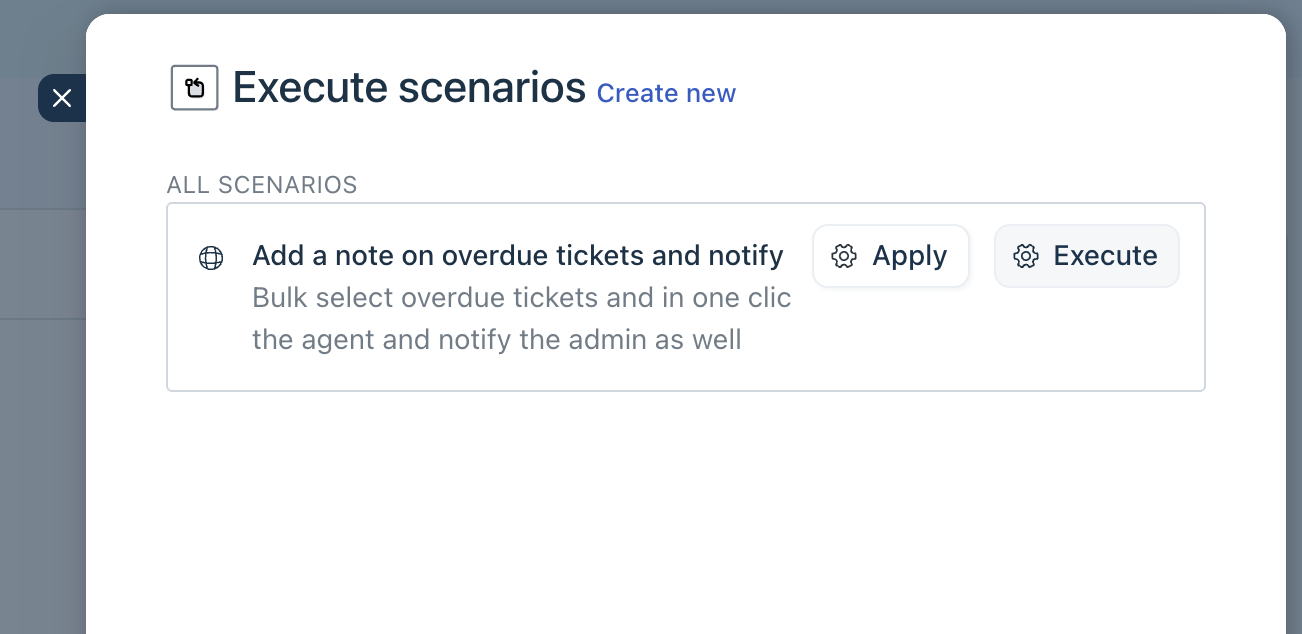
You can also do bulk action on multiple tickets. For details, see Execute Scenario Actions on Tickets.
Log time
Keyboard shortcut (m)
Track the time spent on each ticket using the start/stop timer. To log time:
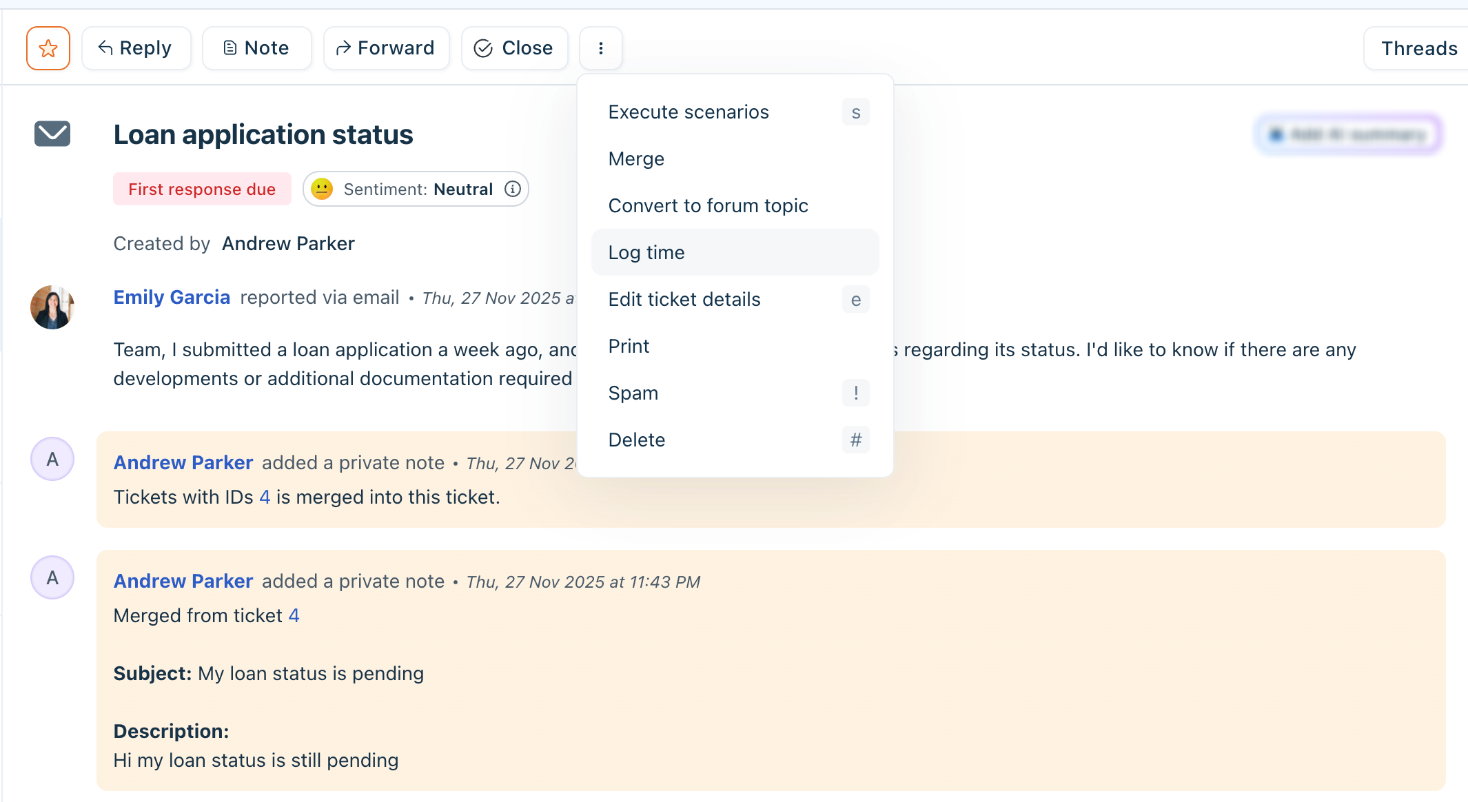
- On the Action bar, click on the three dots and select Log time.
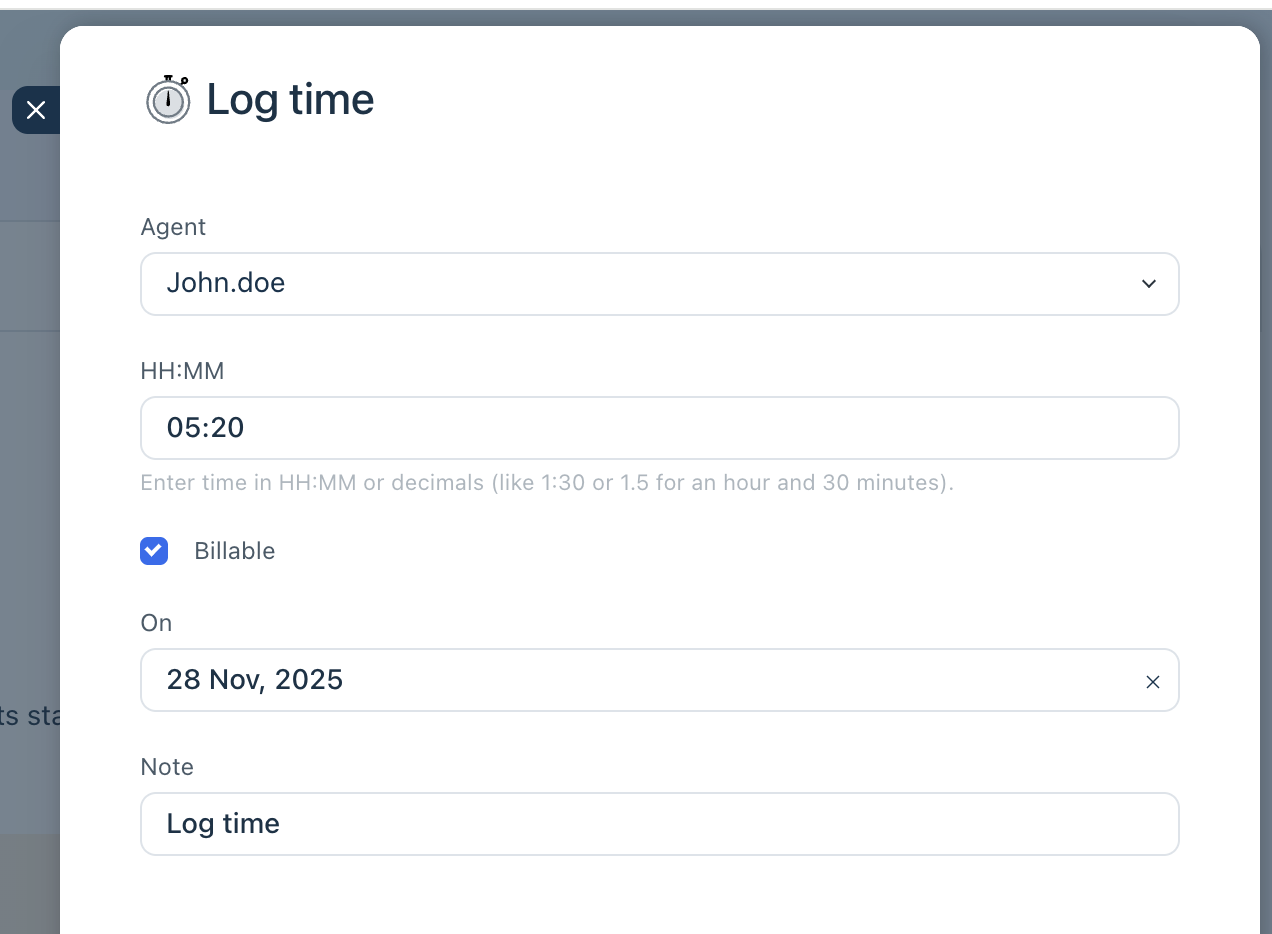
- On the time log pane:
- Choose the agent name.
- Enter the time HH:MM format. You can leave it black to start the automatic timer.
- Add the date and enter any notes, if required.
- Click Save.
Once added, you can see the logs in the Additional Info pane on the right. For detailed information on how time logs, see How to Track Time on a Ticket.
Edit ticket details
Keyboard shortcut (e)
- Use this option to edit the ticket details.
- In the pane that opens, modify the ticket details and click Save.
Other actions
A few more actions you can perform are:
- Delete ticket (#)
- Print ticket
- Mark the ticket as spam
You can view all the spam tickets in the Spam Ticket View.